How to configure your FibreNest Hub
Step 1.
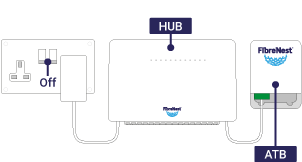
Connect up and power off
Make sure your FibreNest Hub is connected as shown and switched off.
Step 2.
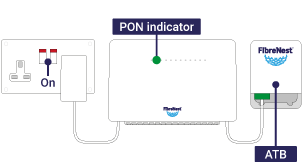
Power back on and check the status of your PON indicator
Turn the power to your FibreNest Hub back on and wait for approximately ten minutes (this is important) whilst it fully powers up. Then, check the PON indicator is illuminated solid green. If it is flashing green, wait for it to turn solid before continuing. If it is illuminated red, this means that there is a fault with your connection and you should contact our Customer Support team on 0333 234 2220.
Step 3.
Connect to your WiFi network
Open the WiFi settings on your computer or smart device and connect to one of the networks found on the rear of your FibreNest Hub:
HUAWEI-2.4G-XXXXX (better range)
HUAWEI-5G-XXXXXX (faster)
When requested to enter the network password, input the 'WLAN Key' printed below the network names.
Step 4.
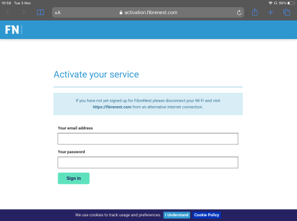
Activate your broadband service
Once you are connected to your WiFi network, you should be automatically directed to our Service Activation page.
Activation page not loading, or just getting a blank screen? Try this process again on a different type of device if possible. For example, try using an iPhone or a laptop if you are having problems setting up your node using an Android device (or vice-versa).
If you have tried this and are still having problems, try typing http://servicecheck.fibrenest.com into your web browser once you have connected to your WiFi.
Login using the email address and password you used to register for FibreNest and follow the on-screen prompts to get online.
That's it!
You should be online